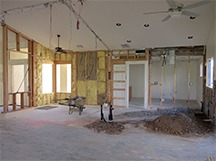
taking down walls – open plan living

what you need to consider before we take down any walls.  our design concept’s foundation is based the client’s envisioned use of their home. we assess the home’s division of public and private spaces. in recent years, builders have shifted the public space to floor plans that provide “great room” living which combines the kitchen, family and an informal eating area in some cases the formal dining room is kept while the formal living room has been eliminated. the private spaces are still compartmentalized into separate smaller rooms.

Herbeck007
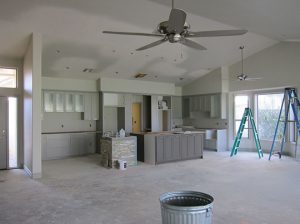
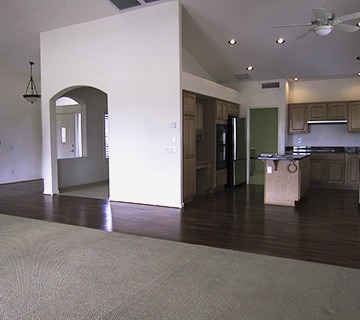
we have found it quite common to design open plan spaces for our remodeling projects and it is unusual for clients to require the opposite. when considering the positives of an open plan – expansive, airy spaces flooded with natural light; increased connection to the outdoors; communal use for all who dwell in the home, one must also consider the negatives – lack of privacy; lack of walls for storage or display; cooking smells and the integration of activities which may occur at the time same – cooking, reading, homework, playing games and television viewing.

IMG_2516

remodeling is a collaborative effort between the client, the contractor and ourselves. we look at each floor plan and begin with our analysis of the home’s orientation to the harsh arizona sun and the impact and degree of natural light. from there the client’s needs as to how they want to use their home will lead us to the best concept based on the client’s lifestyle. we inspire the client to explore multi-use for rooms that would ordinarily be single purpose…dining rooms do not always have to be dining rooms, the same for separate living rooms. we will discuss that topic in future posts.

if you have questions or comments, please write to terry at terry@harrisonherbeck.com.

kitchen backsplash trends

For several years, small mosaic tiles have been trending for kitchen backsplashes.  While I like mosaic, I also like to use large format tiles generally used on floors as backsplash material.  The larger the format gives you less grout lines.  In this example, we used a floor tile that looks like honed stone and used a pencil trim that was thicker than the tile material.  The pencil trim was used at the end of each tile in a vertical application rather than horizontal.  The result is very pleasing and unusual.  The materials play on matte and reflective finishes.

why hire a designer

you want to change your interior. what’s so hard about picking some paint, some tile and maybe a new light fixture? it should be simple, yet it isn’t. you look at pictures and think you know what you want. you want to be sure that the materials selected perform as expected and you want to stay on budget.

hiring a professional will ensure you don’t make costly mistakes. together you will develop a design concept that is tailored to your vision and budget.


before and after

a great designer will inspire you to move outside your comfort zone, look at your environment and utilization of your home’s interior space differently. at the end of the process your new space will enhance your life in ways you never imagined.

art-focused media wall

A recent collaboration between an inspired client, CK Valenti Designs and our firm resulted in a media wall that focused on art work.  The art work, not the television, drove the design of this media wall. Our vision and Chris Valenti’s commitment to excellence resulted in a one-of-a-kind medial wall.  Chris shared,  “One of the things we love about our work is when we can bring to life a very personal addition to our client’s home.  In this case, we designed and built a media center to highlight specific pieces from our client’s art collection.  Working with designer Terry Harrison of harrison herbeck, this custom wall features solid walnut shelving and integrated lighting to focus attention on the art. The end result is a living room wall transformed into a gallery. “

interior color palette

you are at the paint store looking at the hundreds of options for painting your interiors. you are tired of those brown walls…white walls…gray walls….yellow walls…blue walls….why does your neighbor’s home look so much better? you leave more confused than ever. how do you pick the perfect color?

begin by analyzing the natural light. what is the home’s orientation to the sun? does your flooring absorb the light…reflect the light? do you want your furniture to contrast or blend with the walls? you can manipulate your space and cause furnishings and art work to recede or advance depending upon the background colors.

a designer trick is to use a monochromatic color palette by beginning with one color and then lightening or darkening that particular shade. if you have a favorite art piece, pick a bold color from it and use that color in solid pops of color for pillows, drapery, area rugs, throws and accessories.

shades of white and off-white is the emerging trend for 2016. don’t think of hospital white, the whites from sherwin williams, benjamin moore, glidden and dunn edwards are creamy without being sterile. paired with warm or cool tones you will find you can make a visually interesting, warm and welcoming space.

mixing old with new

modern and soft contemporary interiors are here to stay, however, the best way to keep your design from being too sterile is to mix texture and patina into the clean, crisp lines of a modern interior. Modern dining chairs mix beautifully with an old farm table;


a modern square-arm chaise sitting upon a ikat patterned rug; paint grandma’s Chippendale chair cobalt blue or Chinese red. Have less of a thematic interior and instead build layers of eclectic combinations of architecture and design. Give yourself the freedom to mix 18th century design into the 21th century in unexpected ways. Make sure your home reflects your individual interests and bring a variety of styles together in a personal, non-formulaic mix, with an emphasis on quality and detail.

kitchen remodels

part 1:  have a plan.

many of you have been involved in remodeling your home and can attest it was either a great experience, although filled with challenges, or it was filled with stress and didn’t turn out as you had hoped.

to ensure success, have a plan.  do not act on impulse. identify what your goals are.  have a realistic budget and do your homework.  research products and ask questions.  find suppliers who are invested in answering your questions.

sometimes the problem is not you don’t know what you want, you just don’t want what you have.  sometimes you don’t know the questions to ask.  it may benefit you to hire a professional designer to help you define your goals, give guidance regarding the scope of your design and give you feedback regarding materials, what to expect and is your budget realistic.

whether you do it yourself or hire a general contractor….always create the complete plan before you begin.  do not buy anything before your plan is in place.

part 2: the plan

this is where you need to spend time, be patient. why do you want to change what you have?  what is your inspiration?  if the space is not large enough, have you considered removing walls…are you ready for construction? an architect, general contractor and designer will be able to work with you if construction is involved.  take the time to talk to past clients with a list of your concerns.  this will help you make an informed decision when it comes time for you to hire a professional or decide to act as your own general and project manage yourself.  often homeowners have the impression a professional is too expensive, that could be money spent on materials….however, a professional will help you from making costly mistakes and in the long run may pay for themselves.

if you are doing the job yourself you are now ready to take on the task of addressing the sub-contractor categories — framers, plumbers, cabinetmakers, electricians, drywallers and your finish material selections, such as tile, counter top slabs, wood floors, light fixtures, a paint palette and so on.  a spread sheet will be helpful in outlining each subcontractor and specified work.  For example, you want more general lighting and are going to use recessed lighting….the new lights will need to be switched, and that could mean holes in the existing drywall to run new wiring…electrician and drywall, then texture and paint.  make a physical plan of your space and use it in conjunction with the spread sheet.

part 3: the budget

make a list of necessary finish selections — appliances, counter tops, decorative tile, lighting and electrical requirements for fixtures and systems, cabinet requirements, etc.  you will have a list and can allot allowances for each category.   your research with list in hand will help you determine if your budget for all your appliances will be $10,000 or just your refrigerator will be $10,000.  so, if you want an estimated budget that means anything, you need to actually select all the finish materials…appliances, plumbing fixtures, light fixtures/systems, slab counter tops, tile/wood/vinyl flooring material, baseboards, cabinets….fill in the costs and you will have a better idea of what to keep, what to adjust and what to delete.

part 4: preparation

you may think you are ready….thinking about not having a kitchen for several weeks and actually NOT having a kitchen for several weeks are two different things.  be prepared both mentally, financially and physically.  you will be washing dishes in bathroom sinks or tubs, plugging in the microwave on the linen cabinet and if you are without a refrigerator, using a cooler than never has enough ice.  there will be stress.

will you live on take out?  do you have refrigeration for frozen meals and then a way to heat them up? you may want to build temporary housing into your budget if you have children to consider.

part 5:  the process

now that you are ready to begin.  you have a plan, budget and materials.  you have made the decision to be your own contractor or you have hired a designer and/or general contractor, give the project enough time to be completed, have a contingency fund set aside for at least 10% of your projected costs to cover any unseen issues, and there will be unseen issues.  the planning stages are the most important aspect of remodeling.  those who take the time, cover all their bases will be ensured of a successful and rewarding remodeling experience.